UI Overview
PrusaSlicer has a fairly simple user interface. The majority of the screen is dedicated to the 3D view, which is used to manipulate 3D models. The top toolbar (1,2) is used to add and remove objects. The left toolbar (4) has tools for manipulation with 3D models, such as the scale or rotate tool. The right panel is used mainly to select a print, filament and printer profile (6,7,8) and to choose whether or not to generate supports or brim.
The “Slice now” button (5) is used to generate G-code, which can then be exported to an SD card or sent directly to a printer. Some of the advanced functions are hidden by default, you can enable them later by switching to the Advanced or Expert mode (12).
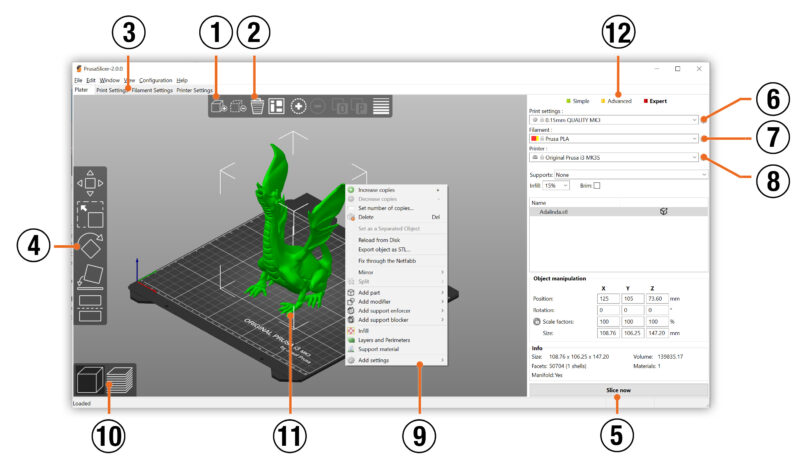
- The Add button loads models into PrusaSlicer
- Delete and Delete All buttons remove the model(s) from PrusaSlicer
- Opens detailed settings of print, filament and printer
- Move, Scale, Rotate, Place on Face and Cut tools
- Slice and generate G-code button
- Quality / Speed setting of a print
- Material selection
- Printer selection
- Right-click on model opens a context menu
- Switch between 3D editor and layers preview
- Model preview
- Switch between Simple / Advanced / Expert mode
Simple, Advanced and Expert Modes
The user interface changes in appearance depending on the mode you’re in. You can switch to a different mode using the buttons in the right panel or by going to Configuration – Mode – Simple/Advanced/Expert.

The reasoning behind the Simple mode is to lower the learning curve for beginners and declutter the user interface for casual users. Complex features like modifier meshes are hidden, and only a basic subset of parameters is shown to the user.
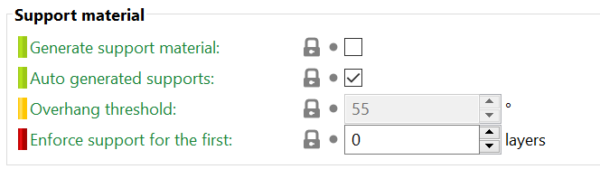
In the Advanced mode, more parameters are shown, and in the Expert mode, all the power features of PrusaSlicer are accessible. To make the learning of parameters easier, we color-coded them
- Green – safe to be tinkered with by a beginner
- Yellow – advanced user may want to modify these parameters
- Red – expert settings most of which should only be touched if you’re making a profile for a new printer